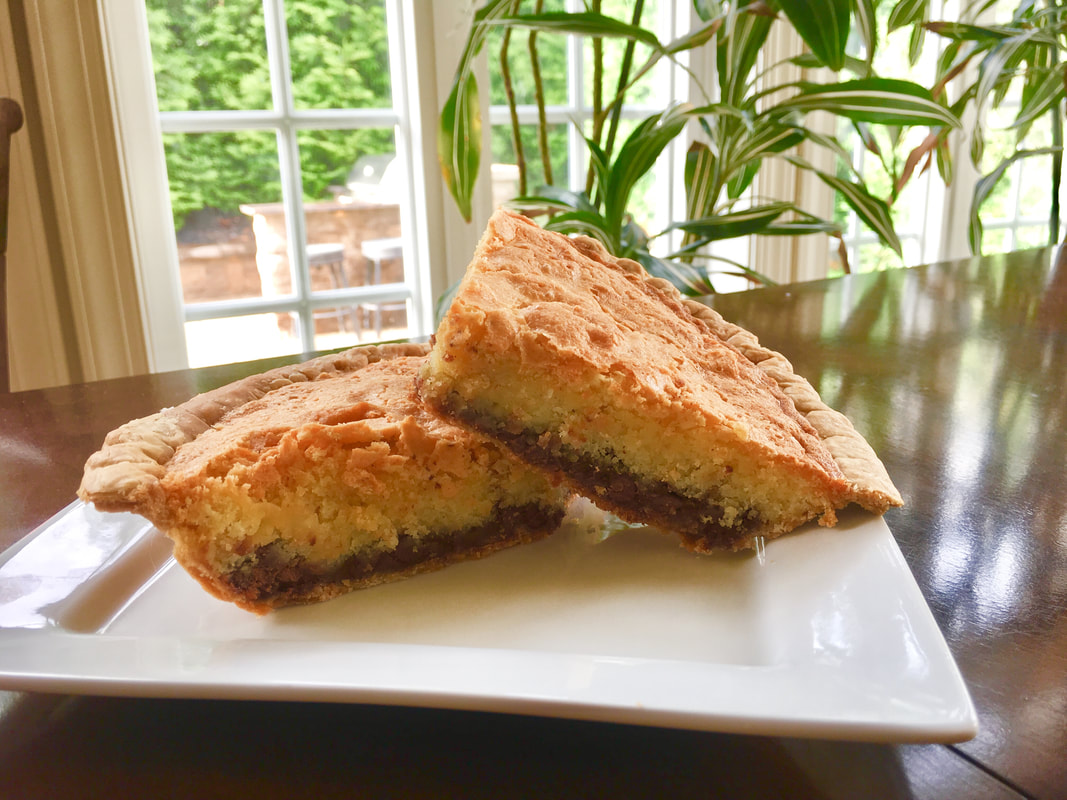
 Yep! I made Kentucky Derby pie again last week. It’s been said that this recipe originated over 50 years ago as a specialty pastry of a nice hotel in Kentucky, (I Google it and it is the Melrose Inn, in Prospect, Kentucky). Also, that the recipe is/was top secret. Therefore, my dessert today could be the real thing or not. Needless to say, it doesn’t matter because I always put my own twist, (even to my own recipes, smile). For instance, I didn’t use walnuts like in the original recipe, and instead of Kentucky Bourbon I used Vanilla and Amaretto Disaronno. In other occasions I use pecans and chocolate liquor. Hope that you try it, you will like it. Approximate Prep and Cooking: 35 to 40 Minutes Approximate Cost: $8.17 (or $1.02 per serving). Difficulty Level: X Easy ____ Intermediate ____ Advanced Servings: 8 Ingredients 2 whisked eggs at room temperature (.30) 1 stick of melted butter (Land o’ Lake at Walmart $1.31) 1 cup of sugar (.50) ½ cup of self-rising flour (.65) 1 cup of chocolate chips ($2.71/bag) (1 cup = $1.36) 1 tbsp. of vanilla ($1.45) 1 tbsp. Amaretto Disaronno (.50) 2 9-inch pie crust partially baked (I used the frozen type or you can make your own) ($2.10) Directions Pre-heat the oven at 350 degrees. Bake the pie crust briefly, about 5-8 minutes, remove from oven let is cool. In a medium size bowl, using an electric mixer, beat the eggs and add the melted butter that is at room temperature and beat. Add the sugar to the bowl and beat until you see the batter is real smooth. Add the vanilla and Amaretto Disaronno. Add the flour until it is all incorporated. Bring the pie crust back and add the chocolate chips, that is your chocolate bottom layer. (Or you can add it to the dough before pouring it into the pie crust.) Pour your batter into the pie crust. Bake for approx. 35 minutes, (depending on your oven) the top should be golden yummy and when a toothpick is inserted into the center, it come out clean. You can eat this pie cool or warm, either way it will blow your mind! HACK: If you eat it warm, dump a scoop of vanilla or butter pecan ice cream on top, and if you want to go further, make fresh caramel sauce and squeeze it over the ice cream as well. Garnish with fresh berries. Then, remember not to eat anything but water the next day! Ha, ha, ha.
1 Comment
 When it gets hot we all come out like the ants to enjoy the sun. Also, to enjoy BBQ parties, picnics, cookouts, family reunions, weddings, well, you name it. We all love to party, and my three main reasons to welcome these activities are in these order; Friends, Fun and Food. However, after going to a party, some of us come home regretting how much we ate there. To me the most important element of going to a party is to enjoy my friends company, sharing news, meeting new ones, etc. Therefore, in order to keep my waistline safe, I developed few hacks that help me enjoy the parties and prevent me from regretting how much I ate.
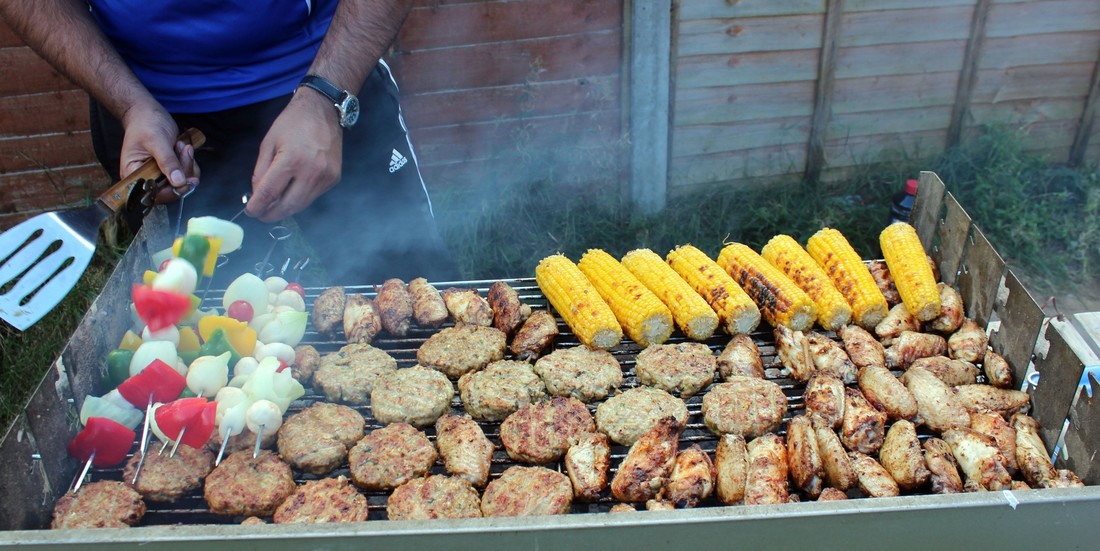
 It’s Memorial Day folks, meaning time to get those BBQ’s in shape for tonight’s dinner. First, don’t just BBQ any meat, make it filet mignon, you deserve it. Then, nothing says warm weather more than fresh BBQ corn, hey but don’t stop there now, make sure that you have plenty of avocados and add the sweet touch of ripen plantains. The good things in life are simple, therefore, share this meal with your family and loving friends. Approximate Prep and Cooking Time: 45 minutes Approximate Cost: $41.20 or $10.30 per serving Difficulty Level: X Easy ____ Intermediate ____ Advanced Servings: 4 Ingredients 4 small to med size filet mignon steaks ($33.55) Kosher Salt to taste (.15) Fresh crush Pepper to taste (.15) 3 tbsp. olive oil (.35) 4 fresh corn ears ($2.00) 4 Goya Baked Ripe Plantains ($2.50) 2 avocados cut in half ($2.50) Directions Clean the fillet, season with 1 tbsp. EVOO, salt and pepper to taste, Refrigerate. Clean the corn well. Prepare a marinate for the corn with 1 tbsp. of olive oil, salt and pepper to taste and brush it over the corn. Use more olive oil if needed, set aside. Start your BBQ and cook the filets and corn together until golden and to-taste; either med. rare, med. well, or well done. When the meat and corn are ready, remove from BBQ and allow to rest for 5 to 7 minutes. While the meat rest, cook the plantains according to the instructions in the box. When ready to plate, slice the avocados in half, peel them and place one half in each plate. Enjoy!  Are you going to a party this Memorial Day Weekend? Worry no more, I got your back. This finger food dish is a great idea to bring to a party. Your host and Their guests will enjoy it. Nothing complicated, just simple ingredients that packs tons of flavors. The best part is that your friends will enjoy these babies while sharing tons of great conversations. Approximate Prep and Cooking Time: Under 30 Minutes Approximate Cost: $10.15 or $1.15/serving (3 turkey balls ea.) Difficulty Level: X Easy ____ Intermediate ____ Advanced Servings: 28 turkey meatballs Ingredients Ingredients for the Turkey Balls ($6.55) 1 lb. 99% fat free ground turkey ($4.99) 2 ½ tbsp. Panko bread crumps (.35) 1 tbsp. roasted garlic and herbs (.30) 1 egg (.16) 1 tbsp. Angie’s dry seasoning (.35) 1 tsp. Angie’s Basting Oil (.40) Ingredients for the Escabeche Sauce ($3.60) 1/2 cup Olive Oil ($1.55) 1 large onion cut in slices (.40) 10 cloves of garlic, chopped (.40) 1 tbsp. rinsed salad olives (.50) 1 tsp. black peppercorns (.15) 2 tbsp. red wine vinegar (.35) 4 Bay leaves (.10) 1 Scallion spring cut diagonally (.15) Directions for the Turkey Balls Mix the ground turkey with Panko bread crumps, roasted garlic and herbs, 1 egg, Angie’s dry seasoning and Angie’s Basting Oil (.40) Make about small 1 ½ “balls and refrigerate. Directions for the Escabeche Sauce Add 1/2 cup Olive Oil (to a skillet and sauté the onion until golden brown. Add the 10 cloves of garlic, chopped. When golden, add the rinsed salad olives, black peppercorns, red wine vinegar and Bay leaves. Cook for about 5 minutes in medium. In a separate skillet, cook the turkey balls in just a tad of my basting oil or olive oil, until golden. Add the turkey balls to the Escabeche sauce and mix well. Garnish with chopped scallions. My Links: Angie’s Dry Seasonings: http://www.angieslifehacks.com/family-life/oven-roasted-bacon-chicken-and-angies-seasonings Angie’s Basting Oil: www.angieslifehacks.com/cuisine/the-flavor-series-recipe-2-angies-basting-olive-oil 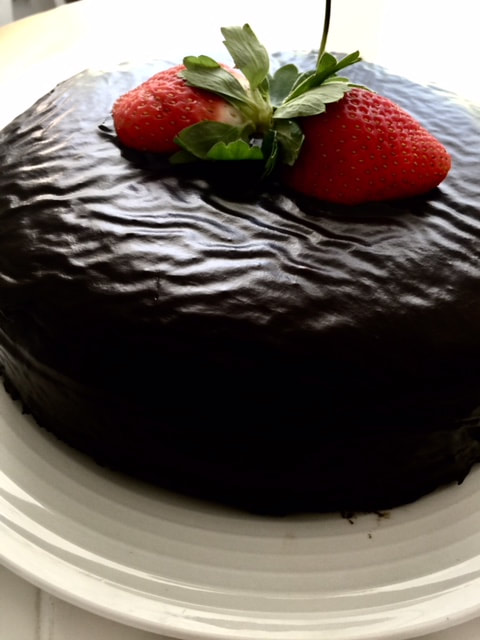 A Génoise cake is just the fancy French name given to a sponge cake. The French use butter; however, I prefer to use peanut oil in my recipe because it makes the cake delicious moist and soft. As you can see, I made 2 cakes; a regular size with icing to give away and a baby cake without icing for me. Smile. Also, I used the basic ingredients that you would use to make a sponge cake; however, by now you know that I love to add my own take to whatever I make. Therefore, I used brandy, butterscotch chips, the best vanilla that you can buy and covered it with healthy dark chocolate icing. Then, I gave it away to my sweet neighbor Tina, who was not feeling well after coming back home from a cruise. Approximate Prep and Cooking Time: One hour Approximate Cost: $12.57 or $1.58 per serving Difficulty Level: __X__ Intermediate Servings: 8 Ingredients for the Cake ($5.94) ½ cup (+ 1/3 cup) of plain bleached cake flour (sifted) (.55) 1 tbsp. (+ ½) cup of sugar (.50) ¼ tsp. salt (.10) ¼ cup peanut oil (.65) 4 large eggs (.64) 1 tbsp. of brandy ($1.00) 1 tbsp. of Vanilla ($2.00) ½ cup of Nestle Butterscotch Morsels (.50) Ingredients for the Dark Chocolate Icing ($6.63) 2/3 cups Hershey’s Dark Cocoa ($1.80) 1/3 cup Evaporated milk (.33) 3 cups Powdered sugar ($1.25) 1 stick of unsalted butter – melted ($1.25) 1 tbsp. Pure Vanilla ($2.00) Directions for the Cake Preheat oven to 350 degrees. Butter a round 9” by 1 ½” baking mold. (You can use in further recipes an 8 by 2” mold or a cup cake mold that holds 12 to 16 cupcakes or you can make a sponge sheet cake in a 12” by 16” sheet pan.) Sift ½ cup of flour with 1 tbsp. of sugar and the ¼ tsp. salt. In a separate bowl, beat the eggs with the remaining sugar. Add the brandy and Vanilla and mix until totally blended. Add at once ¼ of the flour blend that you sifted before. Then add the remaining flour in two times only. Fold a large amount of the batter into the clarified butter and then add it back to the remaining batter. Fold the Butterscotch Morsels into the batter. Pour batter into your prepared mold and tap on the counter few times to get any air bubbles out of the cake. Bake for 30 to 35 minutes and when done, let it cool before decorating with the dark chocolate icing. Directions for the Dark Chocolate Icing Prepare the icing by using the frosting recipe in the back of the Hershey’s Dark Chocolate Powder box. Is very easy. 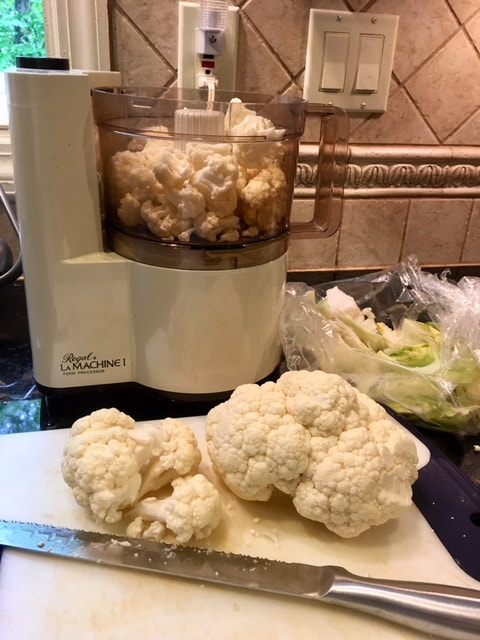 Today, I want to show you what I do with my cauliflower heads. Often times we purchase a lot of veggies, refrigerate them, then don’t use them all during the week. The end result is they begin to spoil in the veggies drawer. Main culprits are lettuces, spinach, broccoli, cauliflower, etc. I do two things to prevent this from happening:
This is my Hack for today, if you use it, you will never have to throw cauliflower away. Cauliflower Rice: As soon as I can, I get my food processor out and a good knife. I clean and cut the cauliflower head in half. Then I put the florets in the processor and pulse until they look like rice grains. I empty the rice in an air tight glass container and use it during the week to make mushroom and garlic sautéed cauliflower rice. Cauliflower Steaks: The other half that I still have I use it for steaks and salad. Therefore, carefully, I slice in 3 to 4 flat pieces. Later on, I season with olive oil, sprinkle adobo on both sides and sear them in my sauté pan. I use the final product as the side for pork or meats. Cauliflower Florets for Salads: It can’t be simpler than this. Separate the florets from the crown in bite pieces and save them in the fridge in an air tight container to use as the crunchy element of your next salad. Yes, no croutons needed. BOOM! 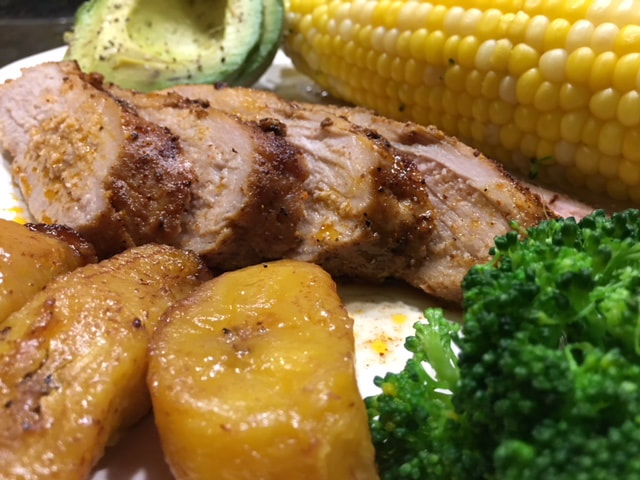 How to cook this meal in a flash: The pork tenderloin roasts in the oven for a short time, the broccoli takes few minutes to steam, the avocado work is just a slice in half away and the plantains are already cooked, just microwave them for a few. Translation; my kind of cooking during hectic week days, make it yours too. Approximate Prep and Cooking Time: Under 35 minutes Approximate Cost: $11.05 or $5.53 per serving Difficulty Level: X Easy ____ Intermediate ____ Advanced Servings: 2 Ingredients 10 slices of roasted pork tenderloin ($6.50) 1 tbsp. Angie’s Basting oil (.50) * 1 tbsp. Angie’s dry seasonings (.40)* 2 fresh corn ears (.80) 6 Goya ripen frozen plantains (.65) 2 broccoli spears from a small broccoli crown (.95) 1 avocado sliced in half ($1.25) * - See my links below Directions Season the pork tenderloin with 1 tbsp. Angie’s Basting oil and 1 tbsp. Angie’s dry seasonings. Roast in the oven at 400 degrees for 20 minutes or until the temperature inside reads 140. In a saucepan with boiling water, cook the corn until tender, about 8 minutes. (I don’t add salt but you could if you like to) (I also don’t use butter, is healthier and super sweet naturally.) When the roast is ready, let it rest for 10 minutes before slicing diagonally, meantime, steam the broccoli in 2 tbsps. water, in the microwave, also after done microwave the plantains. Finally, slice the avocado and you are ready to plate. Enjoy! My links: Angie’s Dry Seasonings: http://www.angieslifehacks.com/family-life/oven-roasted-bacon-chicken-and-angies-seasonings Angie’s Basting Oil: www.angieslifehacks.com/cuisine/the-flavor-series-recipe-2-angies-basting-olive-oil 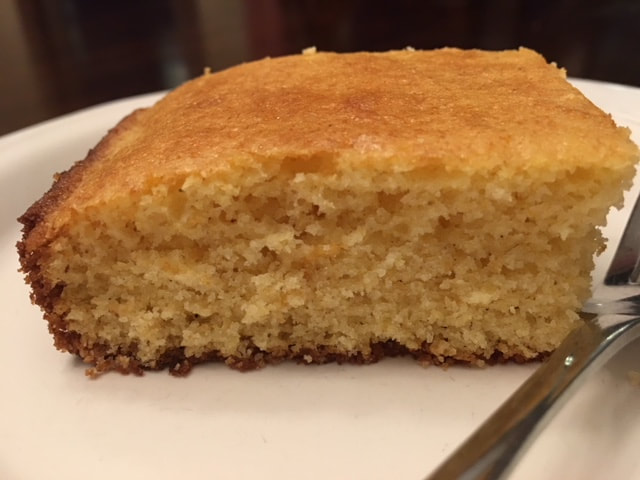 Making Cornbread is a no brainer. Everyone have their own family recipe. It cooks in no time. I am using basic ingredients in my recipe today, however, I enhanced flavors with peanut oil, evaporated milk and cinnamon. I also have another recipe where I use cream of corn. When I want it more dessert like, I use coconut milk, honey, cranberries, cinnamon, ginger and fresh nutmeg. Crazy right? Yeah but I love it. (I am a sweet girl). Then, like if that isn’t enough, I drizzle honey on top, smile! Approximate Prep and Cooking Time: 30 to 35 minutes Approximate Cost: $3.16 or .35 cents a piece Difficulty Level: X Easy ____ Intermediate ____ Advanced Servings: 9 RECETA #1 1 cup fine Goya yellow cornmeal (.45) 1 cup all-purpose flour (.50) 2/3 cup sugar (.40) 2 teaspoons baking powder (.15) 1 teaspoon Kosher salt (.10) 1/2 cup evaporated milk (.55) 1 large eggs (.16) 1/3 cup peanut oil (.65) 1 tsp. cinnamon (.20) DIRECTIONS Preheat oven to 400°F. Butter a 9” baking mold. 1. In a medium bowl, whisk together your dry ingredients: cornmeal, flour, sugar, baking powder and salt. In a separate medium bowl, whisk together milk, eggs and peanut oil. Pour wet ingredients into the bowl with dry ingredients and whisk until completely combined, however, do not over mix. 2. Pour cornbread batter into the prepared cake pan and place in oven. Bake until skewer inserted into middle of cornbread comes out clean, about 20 minutes. Let it cool in pan for 5 minutes, then carefully turn out to a wire rack and let cool an additional 10 minutes. Serve immediately. Reheat any leftover cornbread before serving again and don’t forget to load them with real butter, not nasty margarine, smile. 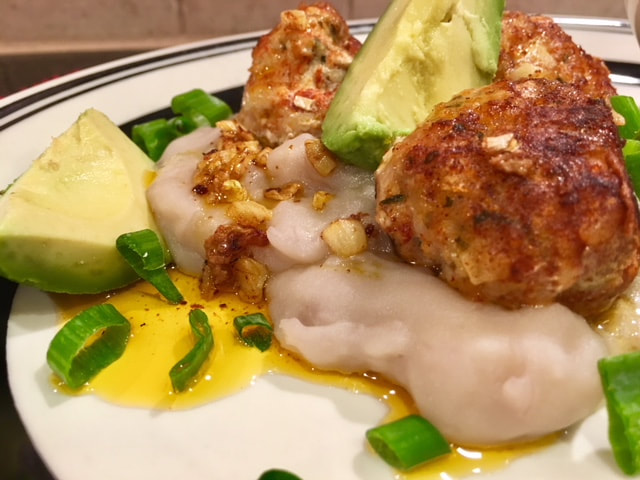 Malanga is usually known as Taro. It’s a root vegetable grown in the tropics because it loves warm climates. This vegetable has a ton of benefits for us. One cup of cooked Malanga contains multiple nutrients; magnesium, phosphorus, vitamins B and C, as well as potassium and protein. Moreover, you would use it as you would potatoes; mashed or in cubes and believe me, I would use Malanga instead of potatoes any time, since the flavor is amazing. Approximate Prep and Cooking Time: 30 Minutes Approximate Cost: $11.63 or $3.88 per serving Difficulty Level: X Easy ____ Intermediate ____ Advanced Servings: 3 A. Ingredients Chicken Balls ($4.05)½ lb. Ground chicken 98% fat free ($4.99/lb. = $2.49) 1 ¼ tsp. Adobo (.20) 1 tbsp. Minced Dry Onion (.30) 1 tsp. Angie’s Basting oil (add 1 tsp. to ground chicken) (.40) 1 ½ tbsp. Panko (.30) ½ tsp. Paprika (.20) 1 egg (.16) Ingredients Malanga ($3.44)½ lb. Malanga root (.89) 1 tsp. Adobo to boil the Malanga (.20) 7 tsps. Angie’s basting Oil (to brown the chicken balls & make garlic sauce) ($2.00) 5 cloves of chopped garlic (.35) Ingredients Black Beans Salad ($1.69)1 can black beans, drained and rinsed (.99) 1 tbsp. salad olives (.20) 1 tsp. Angie’s Basting Oil (.40) ¼ tsp. Adobo (or to-taste) (.10) 1 tsp. lemon juice (O) Ingredients to Garnish ($2.45)1 avocado ($1.25) 1 bunch of chopped scallions (.20) Directions for the Chicken Balls and Garlic-EVOO Sauce Add all the ingredients listed under A. and mix just until they all blend. With a spoon, make 6 to 7 balls of the same size. Brown in the oil. Remove from skillet, add the chopped garlic and Adobo to taste. Drizzle the oil over the malanga when serving. Directions to Cook Malanga Start by peeling the Malanga and cut into 2” chunks. Add to a saucepan enough water, (about 3 cups) and Adobo to taste, bring to a boil. Cook until tender, about 20 minutes, drain, add few tsp. of basting oil and puree it well. Directions for the Black Beans Salad ($1.69) Drained and rinse the can black beans, add them to a bowl. Add the salad olives, Angie’s Basting Oil, lemon juice and Adobo (or to-taste). Mix well. To serve, garnish with avocado and chopped scallions. Enjoy! My Link Angie’s Basting Oil: www.angieslifehacks.com/cuisine/the-flavor-series-recipe-2-angies-basting-olive-oil 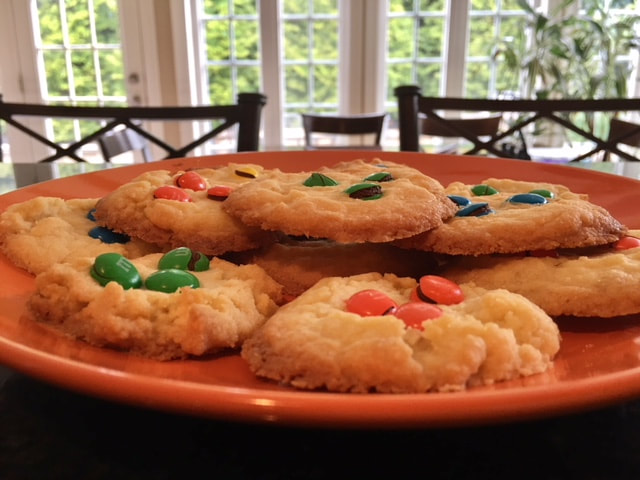 I think that maybe every Latin American country have a variation of these cookies. In Puerto Rico, we make a dent in the middle and place a tiny piece of Guava. Today, I decided to give my own twist by using M&M’s instead of guava and flatten them to make what I call my “My Mantecadito and Chocolate Cookies”. You can make a ton of them in no time and you only need a handful of ingredients. I like them super crunchy in the bottom, so no, they are not burnt, I like them that way, smile. All I can tell you is that they are sooooo good! Approximate Prep and Cooking Time: 35 MINUTES Approximate Cost: $5.51 or .35 cents per cookie Difficulty Level: X Easy ____ Intermediate ____ Advanced Servings: 16 POLVORONES OR MANTECADITOS INGREDIENTS 1 stick of butter, softened ($1.25) ½ cup powdered sugar (.50) 1 cup flour, sifted (.60) 1 egg yolk (.16) 1 teaspoon vanilla (or you can use almond extract) ($2.00) ½ cup of M&M’s ($1.00) DIRECTIONS Cream the butter and slowly add the sugar, beating until fluffy. Beat in the egg yolk. Add the flour and vanilla, mixing well. Chill the dough for at least 1 hour in the refrigerator. Preheat the oven to 350F. Shape the dough into 1″ balls with your hands, and place on a lightly greased or silicon placemat for cookie sheets. Gently press the center of each cookie, add 3 M&M in each cookie. (Or you can either add guava paste or guava jelly, sprinkles or just leave them plain. Bake for 12-15 minutes. Cookie won’t take on much color on top, but will be golden brown on the bottom. Transfer to a cooling rack to cool completely. If desired, sprinkle cookies with powdered sugar. |
ABOUT THE AuthorI am a blogger, a photographer, a jewelry designer, a gourmet cook, and a recipe book writer. I am also a flea market flipper, an avid gardener, an interior/ outdoors designer, an avid golfer and traveler. Categories |
 RSS Feed